
Thinking of Building a Contact-tracing Application? Here's what you can do instead - Part 2
Using technology to foster sustainability in your community
aging tutorial
- 🗓️ Date:
- 🗓️ Last modified:
- ⏱️ Time to read:
Table of Contents
Welcome to the 2nd part of this series on using technology to foster sustainability in your community! In this tutorial, you'll continue building Kartpool — a community driven delivery platform for the ones who need it the most!
Be sure to read Part 1 of the tutorial series thoroughly and complete the exercises before you proceed with this tutorial!
To recap, here’s the list of features:
Feature #1: A location-based store discovery service from where users could buy grocery and other essentials. You already built this in Part 1.
Feature #2: Users can select a store and add a wishlist of essentials that they intend to buy. This wishlist would be visible to other residents.
Feature #3: Any other resident can choose to accept this person’s request and become a wishmaster. Then, they can purchase the items from the store on behalf of the requestor and deliver it to them.
Feature #4: Users can give karma points to runners via a recognition and appreciation system, for being good samaritans and helpful members of the community.
Sounds similar to online grocery delivery platforms right? What’s so different about this one, when so many others are already out there?
Fair question indeed! Let’s look at some problems in the existing delivery business models, and what your platform will help solve:
Problems in traditional delivery models
You may already be aware of several retail delivery platforms out there. Walmart, founded in 1962, operates a multinational chain of hypermarkets, grocery stores and discount department stores along with home delivery, and is arguably the largest retailer in the US in terms of revenue.
In June 2017, Amazon acquired Whole Foods for $13.7 Billion USD and amped up their retail delivery offerings as well. There’s also Instacart— another grocery delivery and pick-up service in Canada and USA. Despite losing Whole Foods as a customer, Instacart holds a whopping 59% of the delivery market. And Kroger, another American retail company, is the second largest retailer in the United States, just behind Walmart.
These developments in the retail and delivery sectors have had various impacts on local businesses:
- While these platforms offer convenience, there can be challenges in ensuring a consistently positive experience for customers who shop at local stores.
- All these platforms have also been at the center of a large number of controversies and lawsuits on issues involving low wages, poor working conditions, treatment of suppliers, and waste management. When local businesses are on-boarded onto these larger platforms, any bad press coverages and negative consequences tend to spill over into your store’s reputation and reviews as well, for probably no fault of their own.
- Large companies slowly end up transforming into a monopoly — taking over smaller businesses and becoming the sole retailer and distribution chain in the area. Eventually your local businesses become very dependent on these platforms, which is a bad idea.
- There are labor costs, and service and delivery charges associated while utilizing larger monopolized platforms. Due to these, businesses would make lesser profits than they did if they were to sell the items directly. In-order to maintain their current profits or to grow, they would inevitably need to raise the prices of items — once again, not an ideal situation for both customers and grocers.
It seems like there are a lot of opportunities for innovation in the delivery model. Time for a fresh new approach!
Local Search and Discovery Platforms
In the previous part, you learned to build a store discovery service that fetches all nearby stores in your neighborhood and displays them on a map.
Over the last decade, local search-and-discovery applications have been seeing a steady rise in usage and popularity. In 2009, Foursquare — a platform of nearly 50 million users — launched a platform that let users search for restaurants, nightlife spots, shops and other places in a location. In 2012, Facebook launched Nearby, Foursquare’s competitor that pretty much did the same thing. And in 2017, Google Maps announced a similar feature that let users create lists of their favorite places to visit.
When you look at the user interfaces in several of these platforms, you observe a lot of similarities — especially on the layout on the home page that shows the places of interest:
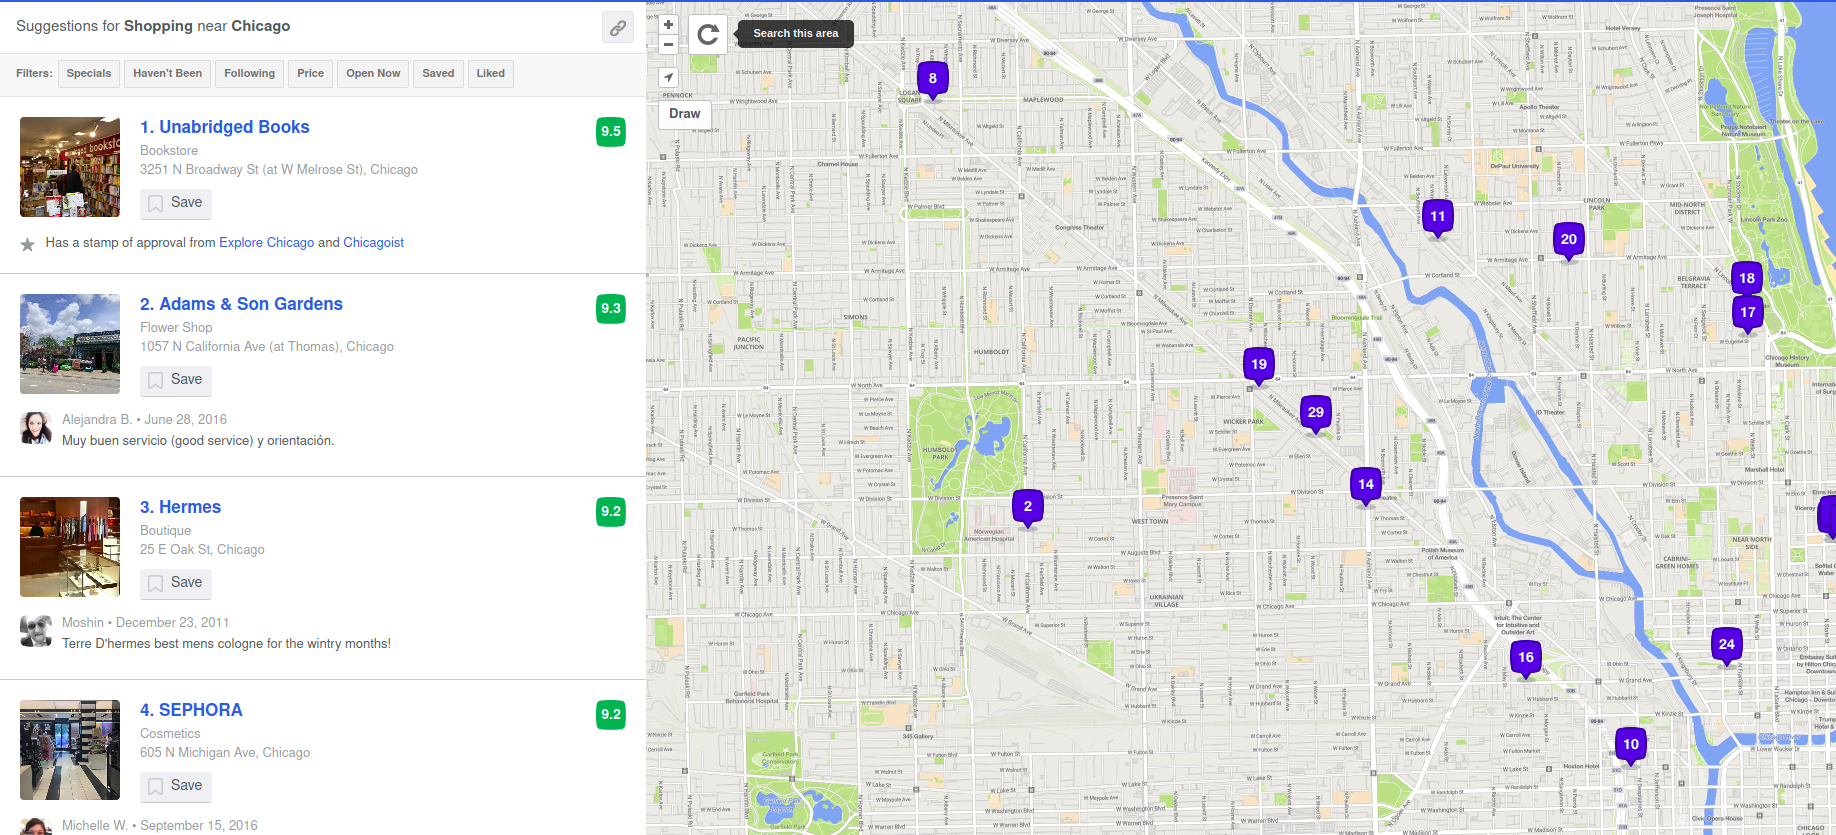
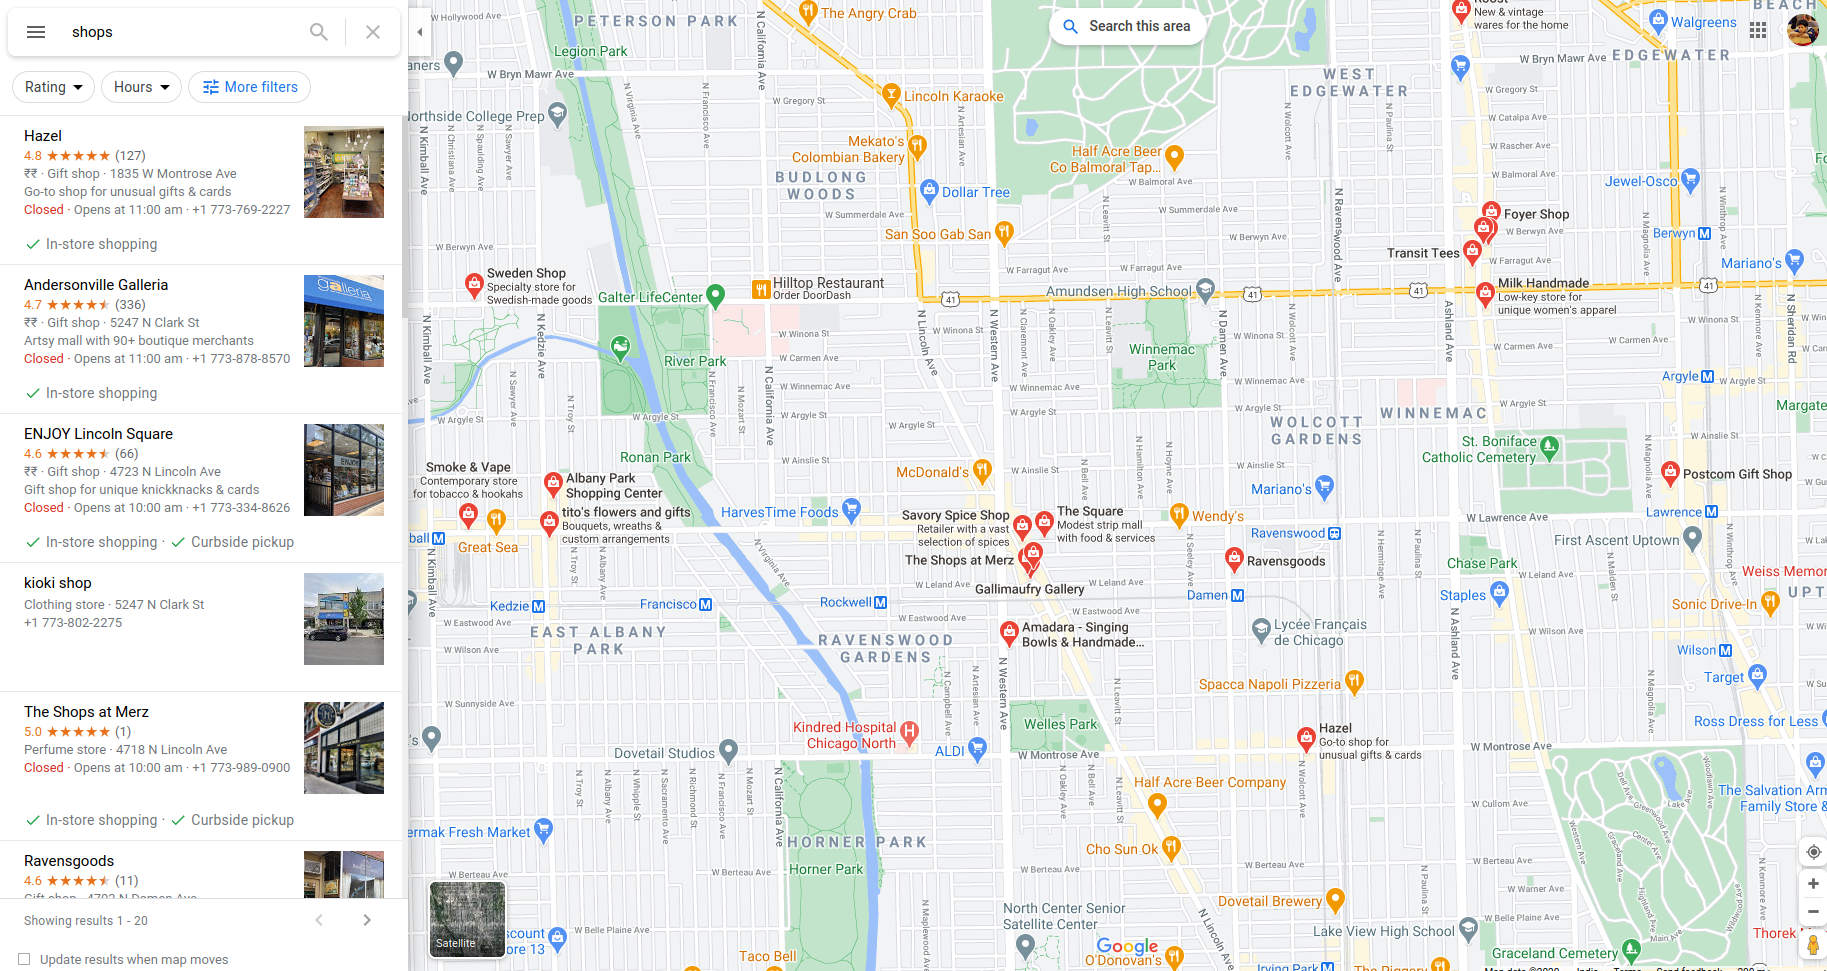
Indeed, if you look at Foursquare’s city guide — the user-interface consists of a small column on the left that displays a list of areas of interest, along with their locations to the right on a wide map. Google Maps also has a similar interface:
And here’s AirBnb:
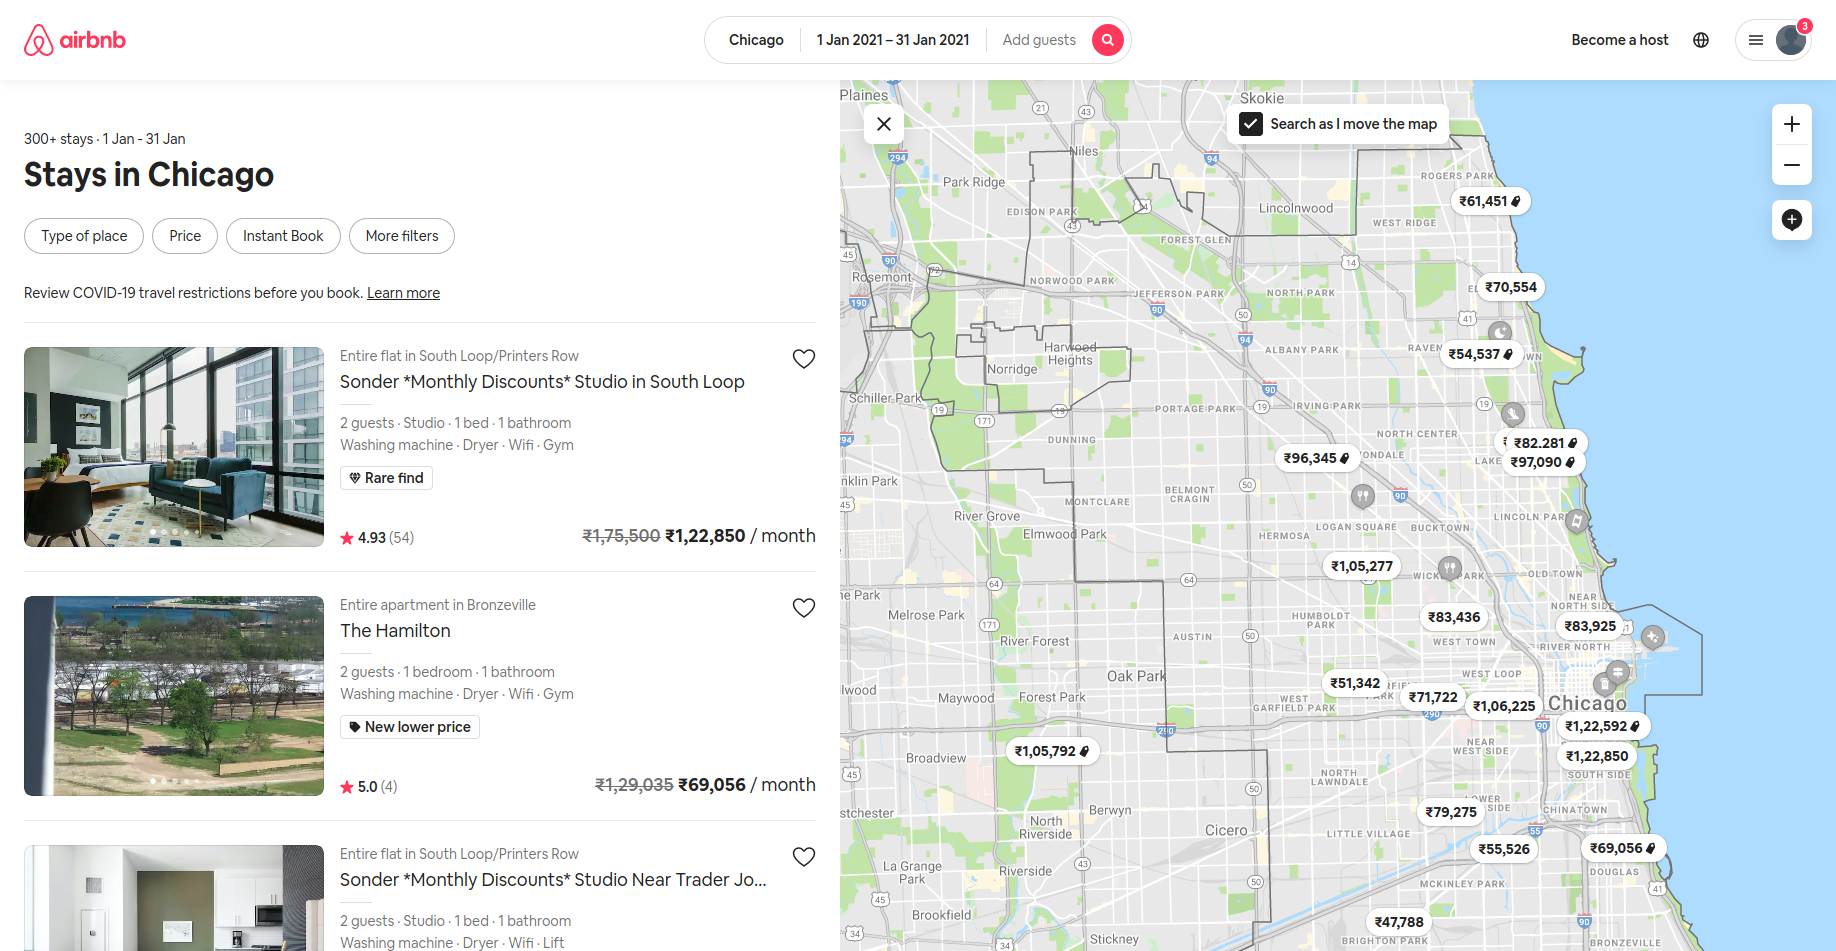
Clicking on one of the items on the left makes the map fly to the associated location and zoom in to the marker icon. Sometimes, it also shows a popup on the marker with some useful information.
So needless to say, these user-interfaces are in vogue because its convenient to navigate through the list on the left, and look at their associated locations on the right on the map.
Deriving lessons from both the online grocery delivery models and local search and discovery applications, this platform that you’ll build might just be what your community needs!
Features
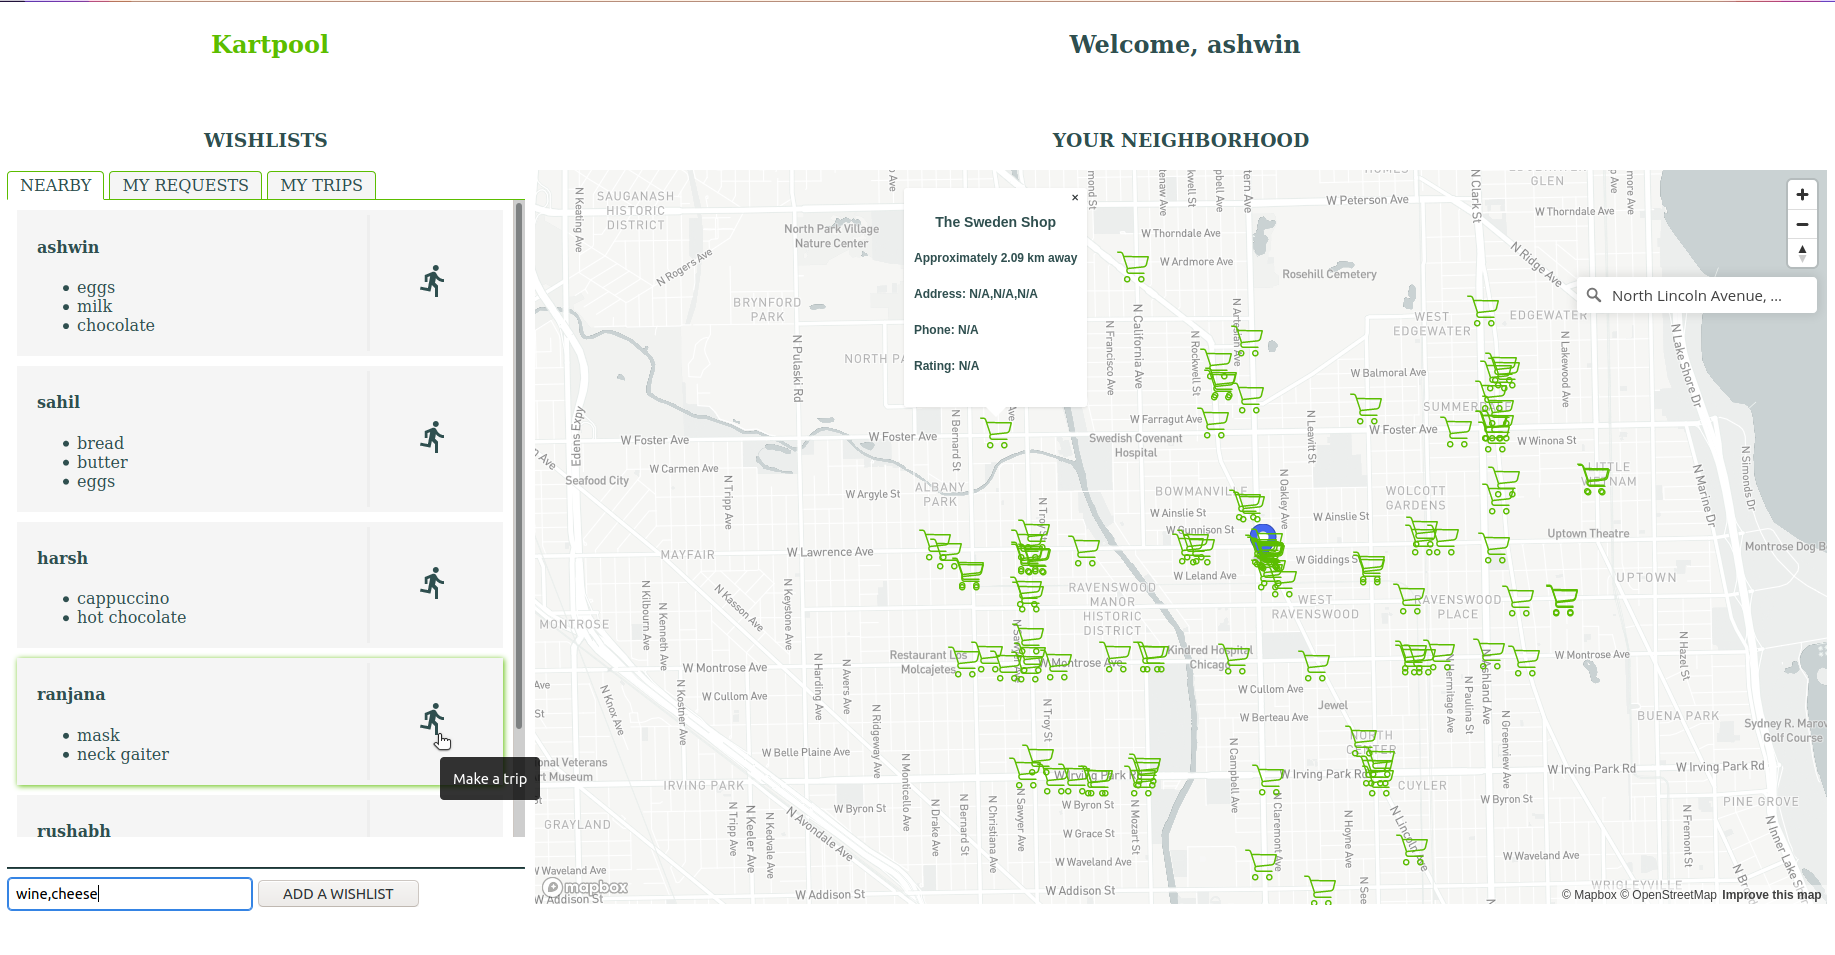
On the right-side you have a map where you’ll type in the name of a location, which then displays stores in the area. You already did this in the previous tutorial.
The left column is a bit different — unlike Foursquare or Google Maps, you won’t be displaying stores here, but wishlists. Clicking on one of the wishlist cards will make the map “fly” to the location of the store, where the items can be purchased from. These list of cards are arranged across 3 different tabs:
- The 1st tab displays all nearby wishlists created by users in the neighborhood. From here, you can accept a wishlist and it will be assigned to you to collect from a store nearby.
- Wishlists created by you will be visible on the 2nd tab.
- The 3rd tab shows wishlists that you accept from the 1st tab. If you mark a wishlist as accepted, you become a wishmaster for that user and it gets added to your trips. You can then make a trip to the store to purchase the items, and mark them as fulfilled once your neighbor receives them.
To create a wishlist, you’ll select a store icon from the map and add the items that you need by using the input-field on the bottom left.
How are these features useful?
Advantages
While most of the year 2020 was spent in lockdowns and quarantines, it also revealed many heart-warming examples of how powerful organized efforts and informed choices of individuals within a community can be.
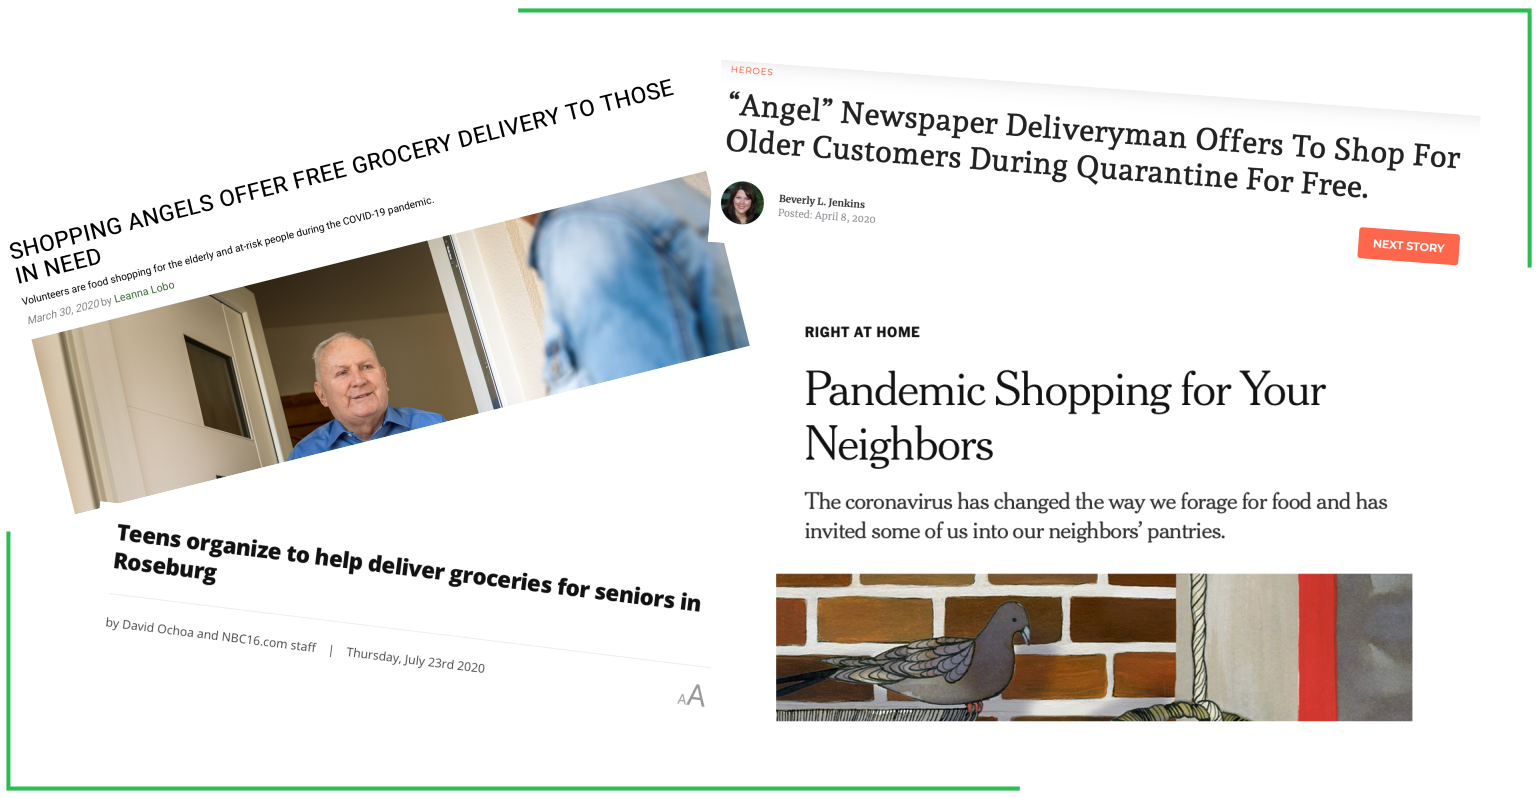
Providing a digital tool that leverages this power can create an immensely positive social and economic impact:
- You could foster virtually an endless shopping experience focused exclusively on local stores and businesses.
- User on-boarding becomes simpler.
- Enable massive reduction in delivery/service fees.
- The business model is socially driven and community-driven, which will foster a feeling of togetherness and readiness to help those in need.
- Not having to rely on middlemen and eliminating needless logistics and packaging would translate into drastic reductions in pollution and consumer waste, thus helping the planet stay green.
I hope you’re excited. Let’s begin!
Engineering
Django
A Django project consists of one or more applications. At the moment, your project root directory contains two applications — stores and home. An application encapsulates a set of related features along with its own models, views, serializers and business logic.
It is useful to group your project logic in this way as it offers a lot of advantages:
- It gives you much better organization and structure of your project, and allows you to maintain separation of concerns.
- Flexible development — one developer could chose to work on features related to stores, while another could chose to work on the wishlists feature.
- Re-usability — you can easily reuse an app and migrate it to another project.
So in your current project, everything that is related to stores is in the stores directory, and everything related to rendering the home page is in the home directory. Similarly, you’ll create a new Django app for the wishlists feature. In your terminal type python manage.py startapp wishlists. This will create a new directory wishlists with its structure similar to the stores directory.
Wishlists
Step #1: Create the database model for storing wishlists
Open wishlists/model.py and add the following code:
from django.db import models
from django.contrib.postgres.fields import ArrayField

# Create your models here.

WISHLIST_STATUSES = [
    ("PENDING", "PENDING"),
    ("ACCEPTED", "ACCEPTED"),
    ("FULFILLED", "FULFILLED")
]

class Wishlist(models.Model):
    created_at = models.DateTimeField(auto_now_add=True)
    buyer = models.CharField(max_length=100)
    wishmaster = models.CharField(max_length=100)
    items = ArrayField(models.CharField(max_length=100))
    status = models.CharField(
        choices=WISHLIST_STATUSES,
        default="PENDING",
        max_length=10
    )
    store = models.ForeignKey(
        "stores.Store",
        related_name="wishlists",
        on_delete=models.SET_NULL,
        null=True
    )
- Each wishlist can have one of three statuses, with the default
statusbeingPENDINGat the time of creation. - A
buyeris that user who creates the wishlist, while thewishmasteris the user that makes the trip to the store and collects the items on behalf of the buyer. - Each wishlist also has a foreign key that’s associated with a valid store-id from the
storesmodel that you implemented in the previous tutorial.
Now you’ll run python manage.py makemigrations followed by python manage.py migrate . Django’s ORM will create the table with the defined schema in the database!
Step #2: Add a serializer
In wishlists/serializers.py, add the following:
from rest_framework import serializers
from .models import Wishlist

class WishlistSerializer(serializers.ModelSerializer):
    class Meta:
        model = Wishlist
        fields = [
            'id', 'created_at', 'buyer', 'wishmaster', 'items',
            'status', 'store'
        ]
Step #3: Define the View Class
Add the following in wishlists/views.py:
from rest_framework import viewsets
from rest_framework.response import Responsefrom .models import Wishlist
from .serializers import WishlistSerializer

# Create your views here.
class WishlistView(viewsets.ModelViewSet):
    queryset = Wishlist.objects.all()
    serializer_class = WishlistSerializer
You’ll add the controller logic for creating, listing and updating wishlists within this class.
Step #4: Define the API service
Add the URL for your wishlists service in kartpool/urls.py:
from wishlists import views as wishlists_viewsrouter.register(r'wishlists', wishlists_views.WishlistView, basename='wishlists')
Any request made to the endpoint /wishlists/ will execute the relevant controller within your WishlistView class.
Now you’re ready to begin developing the wishlist feature for your app.
Note: Some helper methods have already been provided for you in the code, so that you may devote most of your time towards writing the core logic:
- helpers.js: Contains methods to render wishlists.
- api.js: Has functions for making network requests to the
/stores/and/wishlists/endpoints.
Feature #1: Adding a Wishlist
Backend
Create a new file services.py in the wishlists directory.
Here, you’ll write a function that takes in 3 arguments — a buyer, an items array, and a store. This function will create a new Wishlist, save it in the table, and return it.
from django.core.exceptions import ObjectDoesNotExist
from .models import Wishlist
from stores.models import Store

def create_wishlist(buyer: str, items: list, store: Store):
    wishlist = Wishlist(
        buyer=buyer,
        items=items,
        store_id=store
    )

    wishlist.save()

    return wishlist
Next, you’ll import this function in wishlist/views.py and add the controller logic in the WishlistViewclass.
def create(self, request):
    buyer = self.request.data.get('buyer')
    items = self.request.data.get('items')
    store = int(self.request.data.get('store'))

    wishlist = create_wishlist(buyer, items, store)
    wishlist_data = WishlistSerializer(wishlist, many=False)

    return Response(wishlist_data.data)
When when someone makes a POST request to the /wishlists/ endpoint, it’ll run the create method, extract the values for the buyer, items and the store id, and pass them to create_wishlist to create a new wishlist in the db.
Front-end
In order to add a wishlist on the front-end, you’ll need to click on a store marker on the map, and add items on the input-box#wishlist-items separated by commas. Then when you click on the “Add a wishlist” button, it will make a POSt request to /wishlists/ with the required data.
Open wishlists.js and add the following:
async function createWishlist() {
    const wishlistInput = document.getElementById("wishlist-items").value.trim();
    if (USERNAME && SELECTED_sTORE_ID && wishlistInput) {
        addWishlist(USERNAME, wishlistInput.split(","), STORE);
    }
}
This function extracts the value from the input-field, converts it into an array, and passes these values to the method addWishlist, which will make the POST request to add the wishlist into the database!
You’ll now need to run this function upon clicking the Add a wishlist button. Let’s define the event handler for this in index.js:
document.getElementById("add-wishlist").onclick = function(e) {
    createWishlist();
}
Run python manage.py runserver and head over to localhost:8000/?username=YOURNAME. Try adding your first wishlist and some sample wishlists for a few other users as well. You should be able to see them in your database.
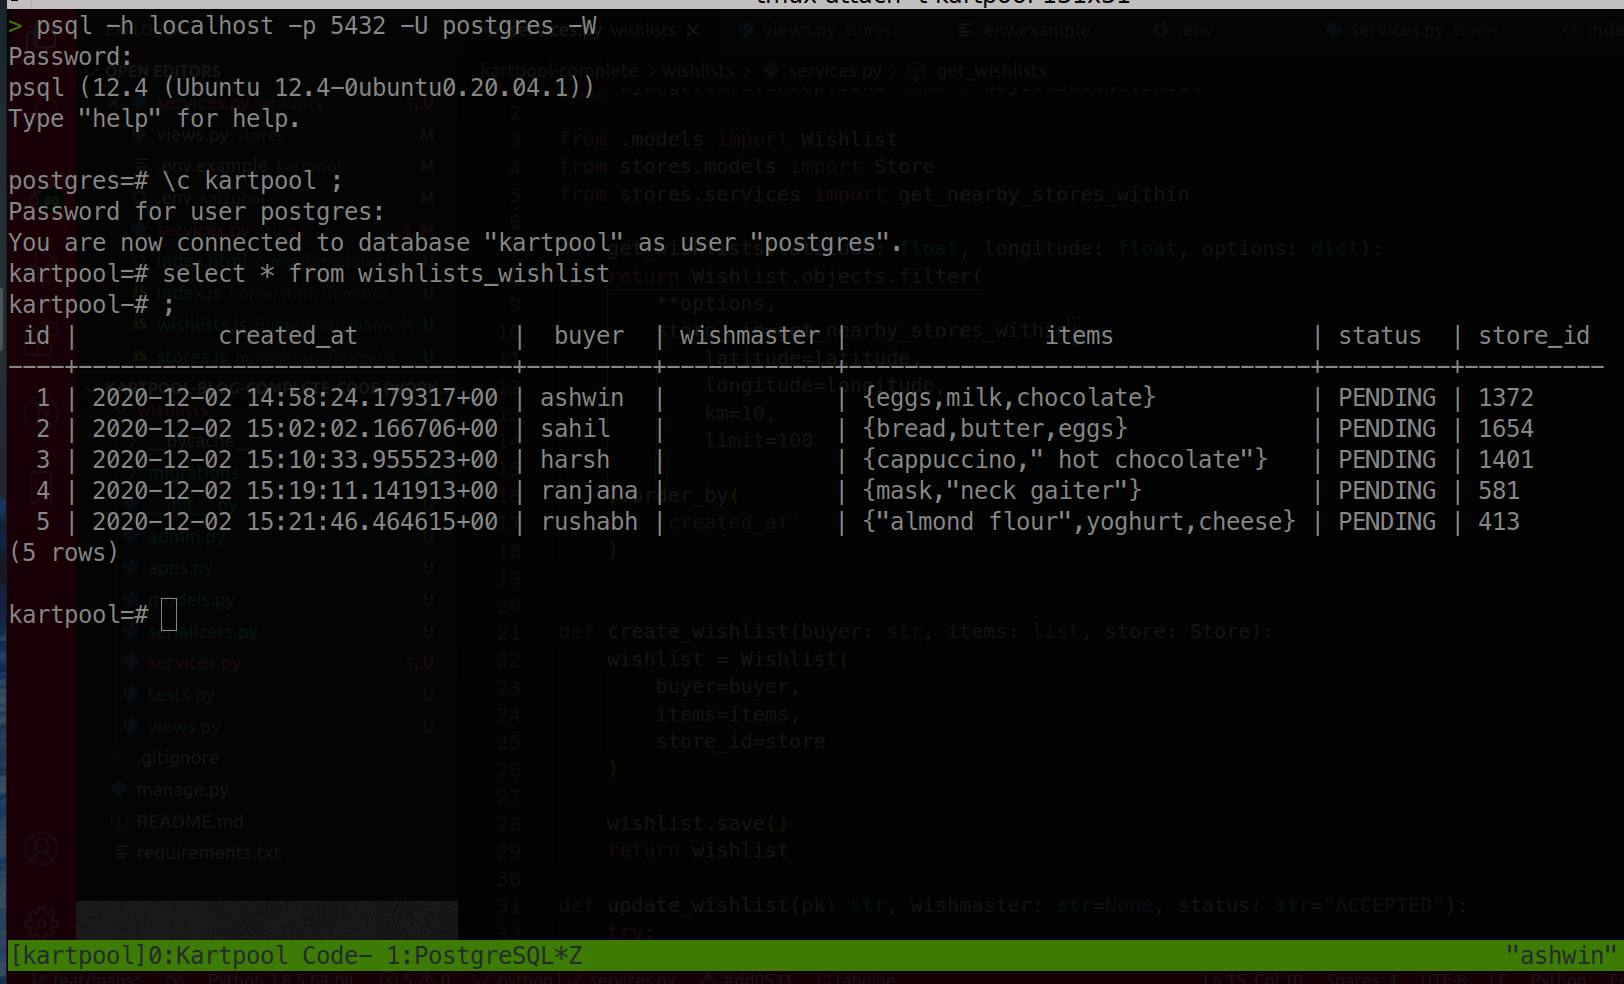
Next, you’ll build the service to fetch nearby wishlists and display them in the UI.
Feature #2: Listing nearby wishlists
Backend
For retriving nearby wishlists, you’ll define a function get_wishlists in wishlists/services.py, that accepts 3 arguments — a latitude, a longitude, and an optional optionsdictionary.
from stores.services import get_nearby_stores_within

def get_wishlists(latitude: float, longitude: float, options: dict):
    return Wishlist.objects.filter(
        **options,
        store__in=get_nearby_stores_within(
            latitude=latitude,
            longitude=longitude,
            km=10,
            limit=100
        )
    ).order_by(
        'created_at'
    )
Using the get_nearby_stores_within function that you wrote in Part 1, we can use the foreign key store and retrieve only those wishlists for which their associated stores are near the given pair of coordinates. That way in the UI, you’ll never have a wishlist for which its store isn’t visible on the map! Makes sense?
With the get_wishlists method, you can retrieve the required data for all 3 tabs for the left column using the options argument:

- If you wish to return your own requests, you just need to retrieve those wishlists for which you’re the buyer. So you’d pass in
{buyer=ashwin}in theoptionsargument. - Likewise, for retrieving your trips, you’ll just need to retrieve those wishlists for which you’re the wishmaster, by providing
{wishmaster=ashwin}.
Next, you’ll import the above function and add the controller logic in wishlists/views.py:
def list(self, request):
    latitude = self.request.query_params.get('lat')
    longitude = self.request.query_params.get('lng')
    options = {}
    for key in ('buyer', 'wishmaster'):
        value = self.request.query_params.get(key)
        if value:
            options[key] = value

    wishlist = get_wishlists(
        float(latitude),
        float(longitude),
        options
    )

    wishlist_data = WishlistSerializer(wishlist, many=True)
    return Response(wishlist_data.data)
Frontend
Inside wishlists.js, you’ll have 3 functions:
displayNearbyWishlists: To show all nearby wishlists in the 1st tab.displayMyRequests: To show wishlists that you created in the 2nd tab.displayMyTrips: To show the wishlists that you accepted in the 3rd Tab.
export async function displayNearbyWishlists(latitude, longitude) {
    try {
        const nearbyWishlists = await fetchNearbyWishlists(latitude, longitude);
        renderWishlists('nearby-wishlists', nearbyWishlists);
    } catch (error) {
        console.error(error);
    }
}
fetchNearbyWishlists makes an HTTP GET request with the given pair of coordinates to the endpoint /wishlists/. Once the wishlists are fetched, you’ll render it inside the tab section with the id nearby-wishlists, using the helper method renderWishlists.
Likewise, add the other two functions as well:
export async function displayMyRequests(latitude, longitude) {
    try {
        const myWishlists = await fetchNearbyWishlists(latitude, longitude, {buyer: USERNAME});
        renderWishlists('my-wishlists', myWishlists);
    } catch(error) {
        console.error(error);
    }
}export async function displayMyTrips(latitude, longitude) {
    try {
        const myTrips = await fetchNearbyWishlists(latitude, longitude, {wishmaster: USERNAME});
        renderWishlists('my-trips', myTrips);
    } catch(error) {
        console.error(error);
    }
}
Refresh the page and try it out!
Feature #3: Store Navigation and Info
Displaying wishlists is great, but how do you know which store to collect it from?
That’s where the foreign key store on our Store model comes in handy, which is present in the JSON response when you make the request to fetch wishlists:

On the DOM, each wishlist card has a data-attribute with the value of the associated store-id:
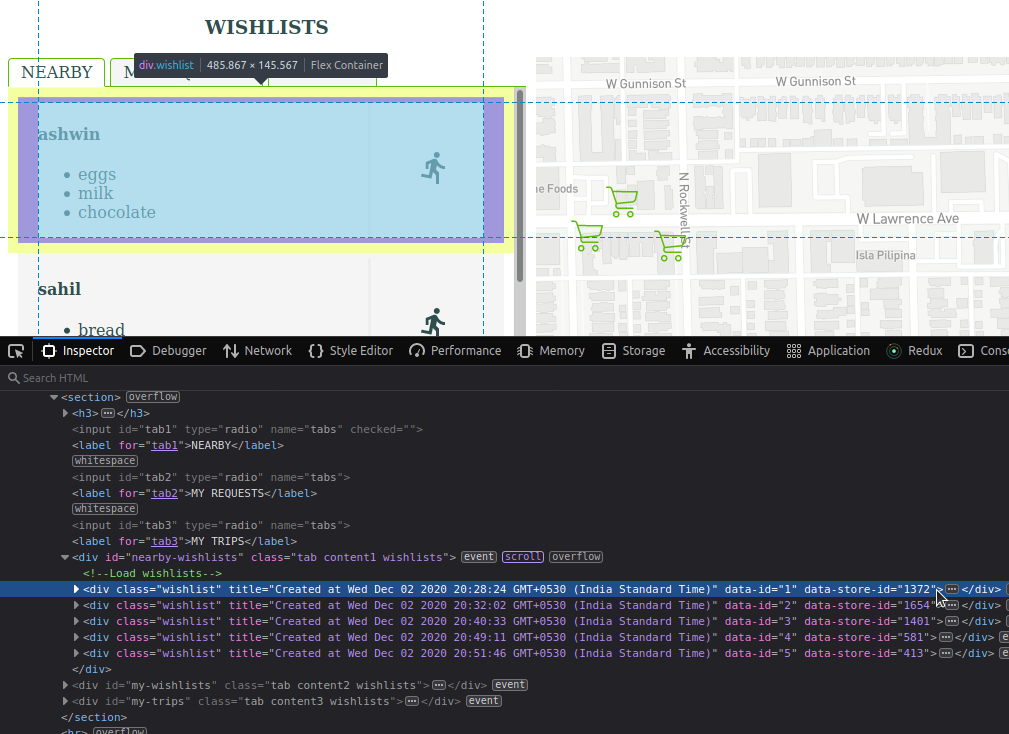
Inside stores.js, add a function setStoreNavigation that takes in 2 arguments — map and storesGeoJson . The function will loop over all the wishlist elements and add a click event listener on all of them. Upon a click,
- Fetch the wishlist’s associated store-id from the
data-store-idattribute. - Then using the store-id, find the relevant store’s GeoJSON information (that also contains the latitude and longitude information) from
storesGeoJson. - Using the store’s coordinates, you can now programmatically make Mapbox zoom into the store’s location.
export function setStoreNavigation(map, storesGeoJson) {
    const wishlistElements = document.getElementsByClassName('wishlist');

    for (let i=0; i<wishlistElements.length; i++) {
        wishlistElements[i].onclick = (event) => {
            const storeId = event.currentTarget.getAttribute('data-store-id');

            for (let point of storesGeoJson.features) {
                if (storeId === point.properties.id) {
                    flyToStore(map, point);
                    displayStoreDetails(map, point);
                    updateSelectedStore(storeId);
                    break;
                }
            }
        }
    }
}
Next, add the function flyToStore that zooms the map into a given pair of coordinates within map.js:
export function flyToStore(map, point) {
    map.flyTo({
        center: point.geometry.coordinates,
        zoom: 20
    });
}
Refresh the page, type in a location in which you created the wishlists in the previous step. Once the wishlists show up, click on one of them and watch the map zoom in to the store marker!
But we’re not nearly done yet.
Accessibility
In the previous tutorial, you added a title attribute to each marker that shows you the store information when you hover your cursor over a store icon. Though it gets the job done, it isn’t nearly good in terms of accessibility.
Along with flying to the store location, what would really be good is to also show a popup on the marker. Lucky for you, Mapbox has a neat little API that does the job!
Add the following function within map.js, and call it inside setStoreNavigation, right after you fly to the store:
export function displayStoreDetails(map, point) {
    const popUps = document.getElementsByClassName('mapboxgl-popup');
    /** Check if there is already a popup on the map and if so, remove it */
    if (popUps[0]){
        popUps[0].remove();
    } const popup = new mapboxgl.Popup({ closeOnClick: false })
        .setLngLat(point.geometry.coordinates)
        .setHTML(`
            <details>
                <summary><h2>${point.properties.name}</h2></summary>
                <dl>
                    <dt>Distance</dt>
                    <dd>Approximately <strong>${point.properties.distance.toFixed(2)} km</strong> away</dd>

                    <dt>Address</dt>
                    <dd>${point.properties.address || 'N/A'}</dd>

                    <dt>Phone</dt>
                    <dd>${point.properties.phone || 'N/A'}</dd>

                    <dt>Rating</dt>
                    <dd>${point.properties.rating || 'N/A'}</dd>
                </dl>
            </details>
        `)
        .addTo(map);
    return popup;
}
Moving on to our final set of feature in this tutorial:
Feature #4: Updating a wishlist
So far, you’ve managed to build stuff that adds quite some oomph factor on the UI. But your app isn’t usable yet.
The real fun begins when a user can pick up one of the wishlists created by someone in the neighborhood. This is where the true value of the application lies — the community aspect that makes it possible for neighbors to help each other and be good samaritans during times of need!
When a wishlist item is first created on the platform, it isn’t assigned to any wishmaster yet, and the default status is set to PENDING. So this is how the card looks like on the UI:
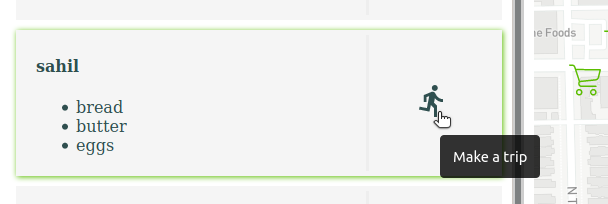
In-order to accept a wishlist:
- Click on the little grey icon on the right-side of the card. This icon has a class value
acceptin the DOM. - Upon clicking the icon, the app will make a
PATCHrequest to the /wishlists/ endpoint. - On the backend, update the wishlist item’s
statustoACCEPTED, and also update thewishmasterfield to the current user. - Finally in the UI, accepted wishlists will be indicated by a little green shopper icon with an
acceptedclass, like this:

Once the items have been picked up by the wishmaster and handed over to the buyer, they can then click on the green icon and mark it as FULFILLED with a similar PATCH request, after which it’ll look like this:

Backend
Create a function update_wishlist inside wishlists/services.py. This function will require 3 arguments — the primary key of the wishlist pk, the wishmaster, and status:
def update_wishlist(pk: str, wishmaster: str=None, status: str="ACCEPTED"):
    try:
        wishlist = Wishlist.objects.get(pk=pk)

        wishlist.wishmaster = wishmaster
        wishlist.status = status

        wishlist.save(update_fields=['wishmaster', 'status'])
        return wishlist
    except ObjectDoesNotExist:
        print("Wishlist does not exist")
You’ll call this method upon receiving a PATCH request to the /wishlists/ endpoint. For PATCH requests, the controller logic needs to be written within the partial_update inside your Class View.
Import the above method inside wishlists/views.py and add the following code inside the WishlistView class:
def partial_update(self, request, pk):
    wishlist = update_wishlist(
        pk=pk,
        wishmaster=self.request.data.get('wishmaster'),
        status=self.request.data.get('status')
    )

    wishlist_data = WishlistSerializer(wishlist, many=False)
    return Response(wishlist_data.data)
That’s all you need for the backend!
Frontend
First you’ll register an event listener for any click events that occur on the wishlists container elements. Add the following code inside index.js:
const wishlists = document.getElementsByClassName('wishlists');
    for (let i=0; i<wishlists.length; i++) {
        wishlists[i].addEventListener('click', updateWishlistStatus);
    }
}
This is how the markup of the card looks like:
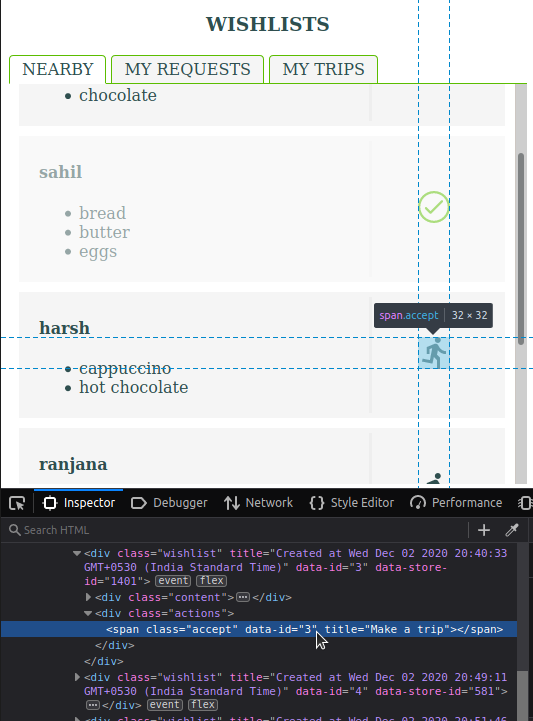
In wishlists.js, you’ll define a function updateWishlistStatus that runs whenever a click occurs anywhere within the three wishlist container elements. Within this function:
- First check whether the click occurred on any of the icons on the right-side of the card. If it did, then
- Grab the wishlist’s primary key (id) from the
data-idfield. - Determine the right
statusvalue to be set, using the class-name of the icon. - Finally call the
updateWishlistfunction from api.js to make thePATCHrequest and update the wishlist!
export async function updateWishlistStatus(event) {
    switch(event.target.className) {
        case 'accept':
            event.preventDefault();
            updateWishlist(
                event.target.getAttribute('data-id'),
                {
                    status: 'ACCEPTED',
                    wishmaster: USERNAME
                }
            ).then((result) => {
                updateWishlistNode(event.target, 'ACCEPTED');
            }).catch(error => console.error(error));

            break;
        case 'accepted':
            event.preventDefault();
            updateWishlist(
                event.target.getAttribute('data-id'),
                {
                    status: 'FULFILLED',
                    wishmaster: USERNAME
                }
            ).then((result) => {
                updateWishlistNode(event.target, 'FULFILLED');
            }).catch(error => console.error(error));

            break;
    }
}
And you’re done. Refresh the page, play around with your app and watch it in action!
What’s next?
Congrats on successfully building a Minimum Viable Product. As an exercise, I leave it to you implement the karma points feature. Don’t hesitate to leave a comment if you need any help!
Once you finish developing all the essential features, it’s time for you to speak to your neighbors, demonstrate to them the usefulness of this service, and get some real active users on the platform. Alone, you can do little — but together, you can do so much more!
Technology is best when it brings people together — Matt Mullenweg
Speaking to members within your community will help you receive valuable feedback for your platform. Here are some nice-to-have features that’ll make your app even more powerful:
- Add the ability for users to sign-up and create accounts in the platform.
- A community hall-of-fame page that displays Samaritans of the month.
- Show a store’s inventory so that users may know beforehand whether they can buy a certain item from a store. You will need to connect with your local businesses for this one!
- Continuously refreshing the page after adding or updating a wishlist is annoying. Why don’t you try adding web-sockets?
- Implement payment integration so that users can make payments directly to the store from within the app.
- Build a Progressive Web App or a native mobile application UI.
Conclusion
Crisis are part of life. Everybody has to face them, and it doesn’t make any difference what the crisis is. Most hardships are opportunities to either advance or stay where you are.
That being said —
You shouldn’t necessarily have to wait until you’re in a crisis to come up with a crisis plan.
The utility of Kartpool will extend beyond emergencies. With big players and large retail chains already eating up local businesses and killing most competition, platforms like these will give the small guys a fighting chance. Your local economy and community will thrive, adapt and grow together in the ever-changing e-commerce landscape and become sustainable!
I leave you with this:
Thou shalt treat thy neighbor as thyself
Source code
Here’s the github repository for reference. In case you have any questions regarding the tutorial, please leave a comment below!
Originally published in Egen Engineering.